How do You Record Screen on Windows 7 with Audio?
Summary: Your computer still runs Windows 7 system but many Google resources are putting more focuses on how to record screen on Windows 10? Never mind, we give you a separate article here to teach you how to screen record on Windows 7 computer, both desktop and laptop are included.
;rgba(153,153,153,0.1);rgba(153,153,153,0.5)" dur="2s" repeatCount="indefinite" /></rect></svg>)
It just surprised me that in the past year, according to netmarketshare, Windows 7, with over 32% market share, is still the second-largest platform version on the computer market (Windows 10 took >46% share). A large number of Windows users and critics even agree that this over 10-year-old system is the best OS Microsoft has ever made. But finally, Microsoft said farewell to this veteran and ended its support since January 14, 2020.
No matter what reason you keep your Windows 7 and didn’t upgrade to 8 or 10, you use your computer to do the same things you need. And screen recording is just one of them. When facing Windows 7 screen recording thing, there are a few questions customers usually concern:
● How do I record the screen on my Windows 7?
● Is there a built-in screen capture app on Windows 7 just like the Game Bar on Windows 10?
● What’s the best screen recorder for Windows 7?
● How do I select the one that suits me most?
If you have any one or more questions listed above, please go ahead to find the best ever answers we can give in this post.
F
To begin with, we have to tell you that Windows 7 doesn’t have any hidden screen recorder like Game bar/DVR that Windows 10 has. Therefore, you have to dig around for third-party screen recording software for your video capture. Here we’ve rounded 3 best ones up in view of compatibility, features, and complexity, all of which are given easy-peasy guides. Hopefully, you can find the one you fancy by walking through their reviews and simple user guides.
![]()
☛ How to Record Windows 7 Screen with Tool #1 RecMaster [The Easiest One]
Pros: Five recording modes (incl. gameplay/audio recording), shoot and save recorded video automatically, multi-monitor capture, task scheduler, VFR/CFR, annotations
Cons: record video @60fps, editor needs to be enhanced, not support hardware acceleration at present
Do you want to start your vlog channel with some screencasting videos? Or you just require some recorder to help capture online movies for local storage. RecMaster as the video as well as audio recorder for Windows 7, can meet all of your capture needs by offering five core recording modes – “Game Mode”, “Full Screen”, “Custom Area”, “Webcam” and “Audio Only”. And the last two features are what many other similar screen recorders for Windows 7 32-bit and 64-bit lack. Now let’s take a look at how RecMaster records screen with audio on Windows 7.

Step 1 – Download & Install
Free download the RecMaster package for Windows and finish the setup on your Win 7 machine. When you launch it, you will see a trial interface like this. Although your Windows 7 is not supported and updated by Microsoft any more, it won’t have any effect on common secure and stable software like RecMaster.
;rgba(153,153,153,0.1);rgba(153,153,153,0.5)" dur="2s" repeatCount="indefinite" /></rect></svg>)
Step 2 – Choose a Recording Mode and Set for It
You are free to take RecMaster as a game recorder to save the fighting moments, a FLV/AVI/MP4 screen recorder to capture the full screen, a certain area/window or the webcam only, and also a screen audio recorder to capture system/mic audio only. Here in the demonstration screenshot, we picked Custom Area mode and planned to grab the selected area for a picture-in-picture VLC instruction.
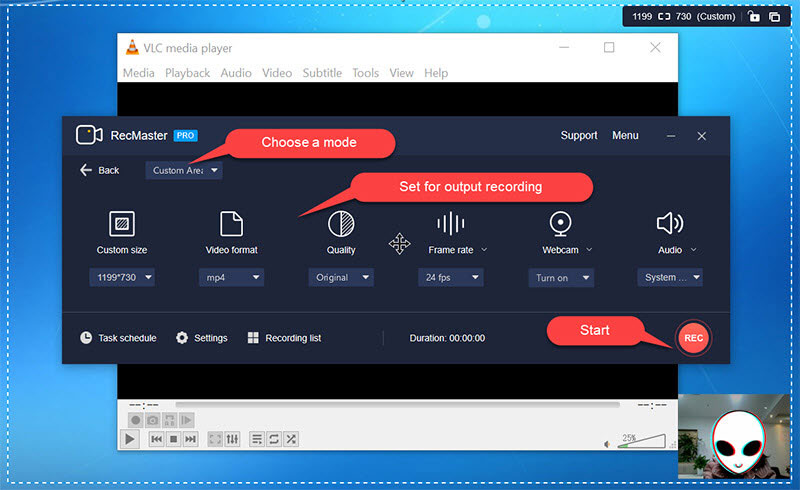
We turned on the front camera, system sound, and microphone, defined the output video as an MP4 @24fps (constant frame rate) at original quality. You can also click “Settings” to add watermark, adjust mouse cursor effect, customize the hotkeys and so on.
Step 3 – Record and Annotate If Necessary
Hit the red circle REC button to get recording started. During this process, you can pause/resume and stop on a small floating toolbar. Also, the toolbar gives entrances to the main window and drawing panel for annotation. Making real-time annotation for notable moments or interesting part is more convenient than doing it afterwards.
![]()
Step 4 – Stop Recording
When the presentation s over, click stop button or use hotkeys (Alt+2 by default) to end the recording. After that, you can view, make easy edits or upload to YouTube with RecMaster.

☛ How to Use to Capture Windows 7 Screen with Tool #2 Filmora Scrn
Pros: Full edit suite, save the recording as GIF, 15-120 fps, upload video to YouTube/Vevo/Facebook/Twitch, GPU acceleration
Cons: Recordings will be added into editor automatically, webcam not appear when shooting picture-in-picture video, scheduled recording unsupported, capture only one monitor
Since Filmora Scrn is a member of Wondershare Filmora family, it’s equipped with a simple Filmora-style editor. Different from the workflow (record and export at one go) of general screen recorders, “Record -> edit -> export” is the standard of Filmora Scrn. Customers who have more requirements on edits will love Filmora Scrn.
Step 1 – Download and Finish the Installation
Download the official version on Filmora Scrn page, and install it by following the wizard.
Step 2 – Open and Get Started with Setup
After you launch Filmora Scrn, there are three buttons located on the main UI –“Get Started” for make settings before recording, “Quick Capture” for popping up the recorder panel, and “Video Editor” for editing video at once.
;rgba(153,153,153,0.1);rgba(153,153,153,0.5)" dur="2s" repeatCount="indefinite" /></rect></svg>)
You are suggested to click “Get Started” to set for what content to capture, video resolution/fps, encoding methods, hotkeys and whether to make use of GPU acceleration. Settings done, click “Capture” to display another small control.
Of course, you can skip this and do “Quick Capture”, because you can also do the same settings afterwards.
Step 3 – Record and Load to Editor
If there’s no change after settings in Step 2, click the red button to start the recording. As you see, there’s no real-time drawing tool, because you can add various annotations later in the editor. When the capture ends, click the stop button to load recording to editor and access to the editor control.
;rgba(153,153,153,0.1);rgba(153,153,153,0.5)" dur="2s" repeatCount="indefinite" /></rect></svg>)
Step 4 – Edit and Export
Filmora Scrn records and loads video/audio/webcam content as a single track here. You can edit and export any of them as you want. You can make your recording looks attractive by applying annotations and cursor effect. You can cut media track, change playback speed and scale the recording at your option.
;rgba(153,153,153,0.1);rgba(153,153,153,0.5)" dur="2s" repeatCount="indefinite" /></rect></svg>)
All edits completed, click the top right corner Export button to output as MP4/MOV/GIF/MP3 or upload this video to hot online sites like YouTube.
☛ How to Use Tool #3 OBS Studio to Record Windows 7 Screen
Pros: Unlimited screens& resources to capture, audio mixer with filters, transitions between scenes, a wide range of configuration options to adjust, H.264 hardware encoding, streaming supported
Cons: No editor preloaded, black screen problems sometimes, hard for recruits to master
For more advanced recording users or those who need to do live broadcasting, free screen recorder for Windows (7-10) – OBS Studio is surely the first choice. While for the newbies, it’s probably a huge difficulty to step into the proficient crowd at a short period of time. We here will show you the easiest instruction on how to use it on your Win 7.
Step 1 – Download and Install It on Your Windows 7
Go to OBS Studio’s official site to free download the full and secure installer of it. After finishing the installation, open it up to continue.
Step 2 – Create Scenes, Sources, and Open Audio Mixer If Necessary
For an entry-level user, if the recording task is not complex like a screen tutorial, a webcam lecture, or a gameplay fight, creating one scene is just enough. Only when your content needs to switch from one to another should you create more scenes at one time.
Below in the picture, we’ve created a scene, with four sources added: Video Capture Device for the integrated web camera, Browser 2 for the OBS official site, Windows Capture for a Microsoft word page, and a hidden Display Capture for the whole Windows 7 desktop. Apart from these four sources, you can add more as shown in the image – Audio Input/Output capture, Game Capture, Image source, VLC capture, text capture … And all of the sources are free to display or hide.
;rgba(153,153,153,0.1);rgba(153,153,153,0.5)" dur="2s" repeatCount="indefinite" /></rect></svg>)
By default, OBS Studio accepts system sound and microphone sources. If you need to add external audio, add audio capture firstly from sources. Thus, it will show in the audio mixer list.
Step 3 – Settings
By clicking “Settings” on the right bottom UI, you will see a comprehensive settings control, among which “Output”, “Video” and “Audio” are the most commonly used ones. You can set recording format, encoder, frame/bit rate, quality, recording path, audio track number and more like these items from three options. You can also explore the rest recording settings if you are so curious like a cat (won’t be killed, lol).
;rgba(153,153,153,0.1);rgba(153,153,153,0.5)" dur="2s" repeatCount="indefinite" /></rect></svg>)
Step 4 – Start and Stop Recording
Tap “Start Recording” to begin the shooting. When your guide/lecture/movie goes over, click “Stop Recording” to end it. OBS Studio will not show you in the folder, so you have to navigate to the saving folder to check the capture. For postproduction, an open-source video editor is your ideal option. Audacity, OpenShot, and LightWorks are our top recommendations.
These three are our picks of best screen recorder software for Windows 7. From entry- to pro-level, free to paid, you can try either or all measure which one is more appropriate for your skill and requirement. Note that they are all friendly to both 32-bit and 64-bit versions of Windows 7. OBS Studio even offers two installer downloads for them respectively, but what a pity the newer versions of OBS don’t officially support Windows 7 any more.
If you plan to upgrade your Windows 7 to Windows 8 or 10, please check these guides:
How to Record Screen on Windows PC
How to Record Screen on Windows 10
How to Record Screen on Windows 8/8.1
How to Record Screen on Windows XP
RecMaster
Screen recording made easy.
Record every moment on your PC or Mac within few clicks.
Download Download
-
How to Use RecMaster, a Screen Recorder with Timer & Auto-Stop
-
How to Record Tutorials Like a Pro Using RecMaster?
-
The Top Halloween Screen Recorder Deals 2025
-
Step-by-Step Guide: How to Record Gameplay Without Lag?
-
RecMaster’s Secret Weapon: The Full Guide to Using the Annotation Tool for Killer Tutorials
-
RecMaster Pro-Tip: Direct MP3 Output for Scheduled Recordings (Audio-Only) 🎧
-
How to Promote Your Game with a Stunning Gameplay with RecMaster?
-
The Ultimate Guide: How to Record Mafia: The Old Country Gameplay with RecMaster?
-
How to Record Gemini Storybook with RecMaster?
-
How to Record Bendy: Lone Wolf Gameplay with RecMaster?
-
How to Set 1-Click Beauty with RecMaster for a Better Look?
-
How to Record in the Best Video Quality with RecMaster (with VBR or CBR)
-
How to Blur Your Webcam Background in RecMaster: A Quick Guide
-
How to Use Spotlight Tool in RecMaster?

RecMaster – Record Every Moment on Your Computer Screen
Record 1080p or even 4K clips at 60fps to maintain the high quality still.
Flexible settings for mouse cursor effects, watermark and annotations.
Preloaded with recording scheduler, video editor. Allow one-click sharing.
Bianca Willis
Bianca Willis started her copywriting career since 2014. As a tech editor with over 6 years writing experience, she has worked out hundreds of posts on multi-media solutions (video recording included), hot gadgets and troubleshooting tips.
Related & Hot Articles


Subscribe to keep up with the latest software discounts , news, and updates.