How to Record Zoom If You Are not the Host?
Recording Zoom meetings and calls are necessary. This is a good way of preventing information loss or misunderstanding. However, Zoom’s default screen recorder is not as powerful as you think – you cannot easily record Zoom if you are not the host.
;rgba(153,153,153,0.1);rgba(153,153,153,0.5)" dur="2s" repeatCount="indefinite" /></rect></svg>)
As a matter of fact, Zoom imposes limitations on those participants who want to record Zoom within this software. This passage will list all the limitations of this Zoom default recorder and introduce a good alternative Zoom video recorder for Zoom users.
Table of Contents
Limitations of Zoom App Recording
- The host possesses the most authority. If you are not a host but want to record Zoom meetings or calls, you need to earn your host’s permission. Hosts are able to give each participant the right to record or auto-record. And every time anyone starts a meeting recording, Zoom will let everyone know there is a recording being implemented, so there is no way for hidden recording.
- Another flaw of the Zoom app’s default recorder is that it allows only PC users to do local recording, this might be unfair for mobile users of Zoom. And to record their Zoom meeting, they can only turn to cloud recording or any 3rd-party recorder for help.
- For paid users, Zoom unlocks the feature – cloud recording for them automatically. But whether the money is cost-effective depends on you to weigh on. Also, you should be very aware of your cloud storage if you accidentally cause file loss because of memory shortage.
- Another inconvenience of Zoom’s default recorder is that if the meeting suddenly blackouts due to the loss of internet or something else, the current recording would corrupt and the worst situation is that they are unable to recover.
Can You Record Zoom If You Are Not The Host?
The answer is yes.
Except for the way of earning the permission of your meeting host, there is a freer and more powerful way to record Zoom without any limitations. That’s to use a third-party screen recorder to capture your on-screen activities.
Third-Party Zoom Video Recorder – RecMaster
Generally, this versatile screen recorder is capable of capturing any content on your PC, producing wonderful footage that consists of intact system audio and microphone sounds. In addition to doing the task of recording online meetings, this software is also able to record VoIP phone calls, streaming videos, Switch Games, and so on.
Step 1. Download and install RecMaster.


Step 2. Launch RecMaster and choose a Recording Mode. There are 5 Modes for users to choose from, Full-Screen is recommended for capturing full-screen meetings, Custom-Area is to meet the requirements of windowed or fixed area recording, Game Mode, as its name suggested, is for capturing games, and Audio-Only is designed for shooting Zoom meeting or call audio purely. The last Mode – Webcam Mode serves to record your own talking head instead of your screen. Here I suggest our users leverage Custom-Area Mode.
;rgba(153,153,153,0.1);rgba(153,153,153,0.5)" dur="2s" repeatCount="indefinite" /></rect></svg>)
Step 3. Select the right video format, and video quality. Tweak the options for audio sources. BTW, features like annotation tools bar and Task scheduler could be super helpful in producing Zoom meeting footage.
Step 4. Click the Red button o record Zoom meetings or calls. For scheduling a recording, once you’ve configured the options in advance, the only thing you need to do is keep RecMaster running in the background and let it operate automatically.
Step 5. When the recording is over, you are offered a choice to edit and share it to YouTube directly.
To become an advanced user of Zoom Recorders, you should first get the hang of the Zoom APP itself and then the 3rd-party software like RecMaster. Hope all of our viewers now have some basic learning about how to record Zoom meetings with RecMaster.
Comparison Between The Zoom Default Recorder and Third-Party Screen Recorder
- Recording Authority:
RecMaster frees users from the restrictions of the Zoom default recorder. Literally, anyone who participates in a meeting can record Zoom without the permission of the meeting host. - Time Limit of Recordings:
Both recorders impose no time limit on recording length. - File Format of Recordings:
For the Zoom default recorder, there are 3 formats – MP4 for video recording, M4A for audio recording, and M3U for playlist playback. RecMaster provides way more formats for users. - File Quality of Recordings:
Zoom gives users a fixed format and RecMaster provides more flexible choices for users.
Can You Record Zoom If You Are Not The Host? – Final Reminders
Users using a 3rd-party recorder to capture Zoom meetings may encounter the problem of RecMaster can’t record Zoom sounds on Mac. This problem is solvable but still, there are several steps to mend it.
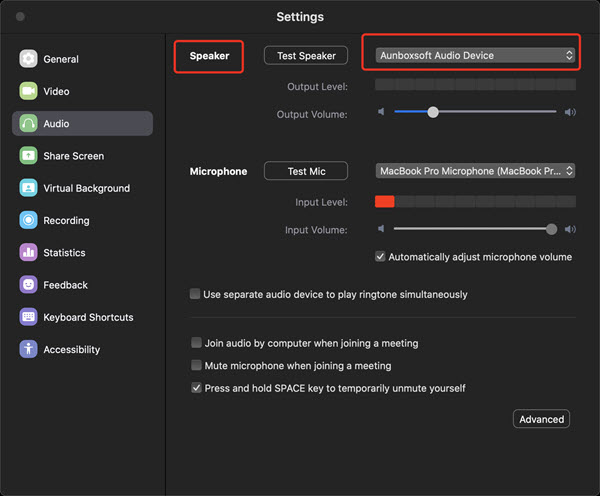
The solution has things to do with the sound driver, which is enabled by default on the Windows computer. For Mac users, they need to reset the sound driver to capture sounds.
Steps: select in your Zoom app -> Settings -> Audio -> Speaker as follows.
RecMaster
Screen recording made easy.
Record every moment on your PC or Mac within few clicks.
Download Download
-
How to Use RecMaster, a Screen Recorder with Timer & Auto-Stop
-
How to Record Tutorials Like a Pro Using RecMaster?
-
The Top Halloween Screen Recorder Deals 2025
-
Step-by-Step Guide: How to Record Gameplay Without Lag?
-
RecMaster’s Secret Weapon: The Full Guide to Using the Annotation Tool for Killer Tutorials
-
RecMaster Pro-Tip: Direct MP3 Output for Scheduled Recordings (Audio-Only) 🎧
-
How to Promote Your Game with a Stunning Gameplay with RecMaster?
-
The Ultimate Guide: How to Record Mafia: The Old Country Gameplay with RecMaster?
-
How to Record Gemini Storybook with RecMaster?
-
How to Record Bendy: Lone Wolf Gameplay with RecMaster?
-
How to Set 1-Click Beauty with RecMaster for a Better Look?
-
How to Record in the Best Video Quality with RecMaster (with VBR or CBR)
-
How to Blur Your Webcam Background in RecMaster: A Quick Guide
-
How to Use Spotlight Tool in RecMaster?

RecMaster – Record Every Moment on Your Computer Screen
Record 1080p or even 4K clips at 60fps to maintain the high quality still.
Flexible settings for mouse cursor effects, watermark and annotations.
Preloaded with recording scheduler, video editor. Allow one-click sharing.
Gary Henderson
As one of the senior editors of RecMaster, I currently concentrate on writing articles about game recordings and also, how-to tips to regular recordings. As an avid gamer, I am skilled at game APIs, game configurations. Helping customers find solutions to game-related issues is never boring stuff to me.
Related & Hot Articles


Subscribe to keep up with the latest software discounts , news, and updates.