YouTube, the magnate video portal website, is attracting users of all ages.
Fascinating content on YouTube never stops satisfying users’ watching desire. The videos could be living streaming for sport, game, music, food, or the hottest vlog, short videos, it is so hard not to be attracted by them. So under such kind of trend, recording YouTube videos become a protruded demand of viewers.
And for laptop users, they particularly show more demands over saving YouTube videos given its attribute of portability. Think about that, will it be pleasing to take an offline-lesson on your long flight journey? Portability is the core advantage of laptops – the compact size, delicate design, convenience to bring, etc see no competent rival device on the market.
So this passage today focuses on teaching you how to record youtube videos on laptops and saving them to your laptop. And this passage also guides you to do the concrete steps on different brands of laptops with different operative systems.
How to Record YouTube Videos on Laptops like Dell, Lenovo, HP Laptop?
Some laptops possess default recorders such as HP laptops, they have HPSR to wield, so it saves HP users energy to record HP laptops. But the problem is that these kinds of default recorders usually lack useful features such as editors and annotation tools. And these problems are intolerable for advanced users.
Below we will show you how to record your laptop screen with our easy and feature-rich screen recorder RecMaster. Please free download it here, finish the setup and then launch it on your laptop from Dell, HP, Lenovo, or so to go ahead.
Step 1 – Choose a Mode
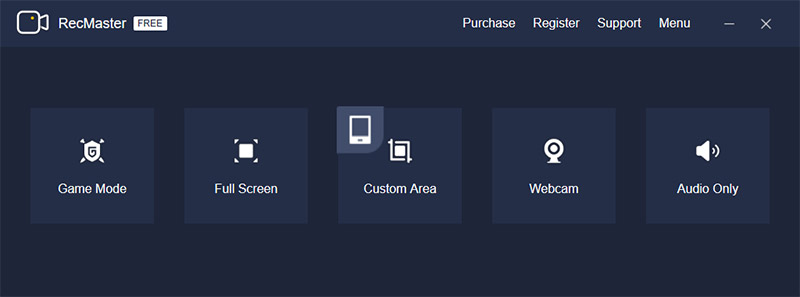
As the picture suggested below, RecMaster has 5 recording modes for you to choose from. They are Game Mode, Full-Screen Mode, Customized-Area Mode, Webcam-Only Mode, and the audio-only Mode. You need to select one Mode and then jump to an overlay for detailed settings.

Step 2 – Set for the Recording
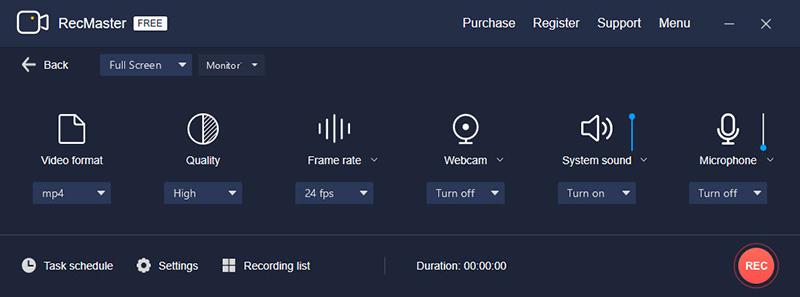
Now it is time to define the video format, recording quality, frame rate, and whether to show the webcam/system sound/microphone.
Specifically, quality level and frame rate both influence the final quality and size of the recorded file. So keep the balance yourself according to your laptop condition and the importance of the capture. By turning on the Webcam, you can show your face alongside the screen and achieve a picture-in-picture effect.

You can also decide your favored saving folder, enable and set cursor effects & watermark, check and change the hotkeys, and also something regarding auto-start. For timed and auto-recording, please leverage the Task schedule feature.
Step 3 – Start and Stop the Recording
Once the tasks for pre-settings are accomplished, click the red buttons to start, pause, and end the recording. During the recording, annotation work is available, access to its control by clicking the Annotation icon on the small floating bar. After the recording, you are empowered to do easy edits and share the work online directly to YouTube or Google Drive in clicks.
How to Record YouTube Videos on Laptop Like MacBooks?
MacOS’s got a default screen recorder – QuickTime for users to record screen, but this software is wildly known as incompetent at recording system sounds. To fix this problem of no sound, you should download Soundflower.
Another out-of-box solution that saves you from the complicated workflow is asking a third-party YouTube recorder for help. You can regard easy desktop screen recorder – RecMaster as the integrity of QuickTime and Soundflower. This very software gives stable performance when it does its job to record YouTube videos on Mac.
RecMaster supports Mac OS X 10.11 and later. You can refer to this article to see specific differences between QuickTime and RecMaster.
Steps:
1. Download and Install RecMaster.
2. Choose Recording Mode.

3. Entering the Setting Panel and do some changes for better deliverance of your videos.

4. Start Recording and add annotation tools to your videos to make them full of changes. This feature is super useful if you want to record tutorial videos from YouTube. You are offered a whiteboard to take notes and add annotation tools.
5. Stop recording and find the footages at Recording List.
Final Words
All in all, record YouTube videos on laptop of HP, Lenovo, MacBook, and other brands are not hard with the assistance of RecMaster.

RecMaster
Screen recording made easy.
Record every moment on your PC or Mac within few clicks.
Download Download
-
How to Use RecMaster, a Screen Recorder with Timer & Auto-Stop
-
How to Record Tutorials Like a Pro Using RecMaster?
-
The Top Halloween Screen Recorder Deals 2025
-
Step-by-Step Guide: How to Record Gameplay Without Lag?
-
RecMaster’s Secret Weapon: The Full Guide to Using the Annotation Tool for Killer Tutorials
-
RecMaster Pro-Tip: Direct MP3 Output for Scheduled Recordings (Audio-Only) 🎧
-
How to Promote Your Game with a Stunning Gameplay with RecMaster?
-
The Ultimate Guide: How to Record Mafia: The Old Country Gameplay with RecMaster?
-
How to Record Gemini Storybook with RecMaster?
-
How to Record Bendy: Lone Wolf Gameplay with RecMaster?
-
How to Set 1-Click Beauty with RecMaster for a Better Look?
-
How to Record in the Best Video Quality with RecMaster (with VBR or CBR)
-
How to Blur Your Webcam Background in RecMaster: A Quick Guide
-
How to Use Spotlight Tool in RecMaster?

RecMaster – Record Every Moment on Your Computer Screen
Record 1080p or even 4K clips at 60fps to maintain the high quality still.
Flexible settings for mouse cursor effects, watermark and annotations.
Preloaded with recording scheduler, video editor. Allow one-click sharing.
Related & Hot Articles
Subscribe to keep up with the latest software discounts , news, and updates.


